The fuel level sensor is a crucial component in a vehicle’s fuel system, ensuring that the driver has accurate information about the fuel level in the tank. When the sensor malfunctions, it can lead to incorrect fuel readings, fluctuating gauges, and even unexpected fuel shortages, potentially leaving the driver stranded. Testing the fuel level sensor is essential to diagnose whether it’s functioning properly or if a replacement is needed. This article will guide you through the process of testing your fuel level sensor, helping you identify potential issues, understand the necessary steps for troubleshooting, and determine whether repairs or replacement are required.
Common Signs That Your Fuel Level Sensor Needs Testing
If your fuel level sensor is malfunctioning, it can cause a range of issues that impact your vehicle’s fuel readings. Here are the most common signs that indicate the sensor may need testing:
1. Inaccurate Fuel Readings
When the fuel level sensor is faulty, the fuel gauge may display incorrect readings. For example, it might show the tank as full when it’s nearly empty or as empty when there’s still plenty of fuel left. This can lead to confusion and potentially running out of fuel unexpectedly.
2. Erratic Gauge Movements
A malfunctioning sensor can cause the fuel gauge to fluctuate erratically, jumping between full and empty or moving without a consistent pattern. This can occur even if the fuel level hasn’t changed, making it difficult to rely on the readings.
3. Constant Low Fuel Warning
If the low fuel warning light remains on, even when there’s a sufficient amount of fuel in the tank, it’s a sign that the sensor is not accurately detecting the fuel level. The sensor may incorrectly signal that the fuel is low, triggering the warning light unnecessarily.
Tools You’ll Need for Testing
To test a fuel level sensor effectively, you’ll need a few essential tools. These tools will help you diagnose whether the sensor is functioning properly or if it requires replacement. Here are the main tools you'll need:
1. Multimeter
A multimeter is a versatile tool used to measure the electrical resistance of the fuel level sensor. It helps determine if the sensor’s resistance changes as the fuel level fluctuates. By testing the sensor's resistance, you can identify whether it’s functioning within normal parameters or if it’s faulty.
2. OBD-II Scanner
An OBD-II scanner is a diagnostic tool that allows you to read and interpret trouble codes from the vehicle’s onboard computer. If the fuel level sensor is malfunctioning, the vehicle’s ECU (engine control unit) may log error codes related to the sensor. Using an OBD-II scanner, you can quickly identify these codes (such as P0460 or P0463), which can point to specific sensor issues or wiring problems.
3. Vehicle Manual
The vehicle manual provides critical information on the location of the fuel level sensor, as well as the wiring and connections associated with it. This is important for understanding how the sensor is integrated into your vehicle’s fuel system and for safely accessing it during the testing process.
Step-by-Step Guide to Testing a Fuel Level Sensor
Testing a fuel level sensor involves a series of steps to determine if it is functioning properly. Here’s a simple guide to help you through the process:
Step 1: Disconnect the Battery
Before starting any diagnostic procedure, always disconnect the vehicle’s battery. This ensures safety when working with electrical components and prevents accidental short circuits or other electrical issues.
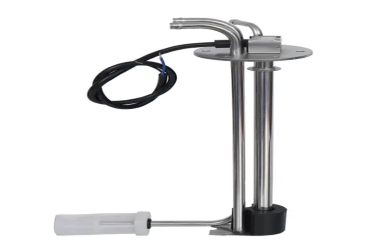
Step 2: Locate the Fuel Level Sensor
The fuel level sensor is typically located inside the fuel tank or integrated with the fuel pump module. Consult your vehicle manual to identify the exact location of the sensor, and access it through the fuel tank’s access panel or by removing the fuel pump assembly, depending on your vehicle model.
Step 3: Check the Sensor’s Wiring for Damage or Corrosion
Inspect the wiring and connectors leading to the fuel level sensor. Look for any visible damage, fraying, or corrosion. Corroded or loose connections can disrupt the signal between the sensor and the vehicle’s fuel gauge, leading to inaccurate readings. If you find any damaged wires, they may need to be repaired or replaced.
Step 4: Use a Multimeter to Test the Sensor’s Resistance
Using a multimeter, measure the resistance of the fuel level sensor. Resistance should change as the fuel level in the tank changes. For a resistive sensor, connect the multimeter probes to the sensor’s terminals, and move the float manually (if possible) to simulate varying fuel levels. The resistance should fluctuate between a set range (e.g., 0 to 90 ohms). If the resistance remains the same or shows abnormal readings, the sensor may be faulty.
Step 5: Test the Sensor with an OBD-II Scanner
Connect an OBD-II scanner to the vehicle’s diagnostic port and check for any error codes related to the fuel level sensor. Codes like P0460 (Fuel Level Sensor Circuit Malfunction) or P0463 (Fuel Level Sensor Circuit High Input) indicate problems with the sensor or its wiring. The scanner can provide specific trouble codes to help diagnose the issue more accurately.
Step 6: Check for Physical Damage (e.g., Float Mechanism)
If the sensor’s electrical components check out, inspect the float mechanism (if accessible). The float is responsible for detecting the fuel level and adjusting the sensor accordingly. If the float is stuck, damaged, or obstructed by debris, it could cause inaccurate readings. Ensure the float moves freely and isn’t damaged.

Interpreting Test Results
After testing the fuel level sensor, interpreting the results will help you determine if it’s functioning correctly. Here’s how to analyze the resistance readings and OBD-II codes:
1. Resistance Readings: What Normal and Abnormal Resistance Readings Mean
Normal Resistance Range:
For resistive sensors, the typical range is 0 to 90 ohms.
Full tank: Around 0 ohms.
Empty tank: Around 90 ohms.
The resistance should change smoothly as the float moves.
Abnormal Resistance Readings:
No change in resistance: Indicates a stuck or damaged sensor.
Out-of-range readings: Resistance much higher or lower than the expected range (e.g., over 100 ohms or under 0 ohms) points to a sensor malfunction.
Erratic readings: Inconsistent changes in resistance suggest internal damage or wiring issues.
2. OBD-II Codes: How to Interpret Error Codes Related to the Fuel Level Sensor
Common OBD-II error codes help identify sensor problems:
P0460 – Fuel Level Sensor Circuit Malfunction: Indicates the sensor is not sending a signal or the signal is lost.
P0461 – Fuel Level Sensor Circuit Range/Performance: The sensor is providing out-of-range or inconsistent readings.
P0463 – Fuel Level Sensor Circuit High Input: The sensor is sending a higher-than-expected signal, likely due to a short circuit.
P0462 – Fuel Level Sensor Circuit Low Input: The sensor is sending a lower-than-expected signal, possibly due to an open circuit.
What to Do if the Test Indicates a Fault
If your test results show that the fuel level sensor is malfunctioning, here are the steps you should take to address the issue:
1. Replace the Sensor
If the sensor itself is faulty or the resistance readings are out of range, it’s likely that you need to replace it. Common signs that replacement is necessary include:
Stuck or Damaged Float: If the float mechanism is damaged or stuck, it can’t accurately measure fuel levels, and repair may not be possible.
Consistent Incorrect Readings: If the sensor fails to produce normal resistance changes or gives erratic readings even after troubleshooting, it’s time for a replacement.
Failed OBD-II Codes: If the OBD-II scanner continuously shows error codes related to the sensor (like P0460, P0463, or P0461), a replacement is typically required to restore proper function.
Replacing the sensor involves:
Draining the fuel tank (to ensure safety).
Removing the old sensor and installing the new one according to the vehicle's manual.
2. Repairing Wiring Issues
Sometimes, the problem lies in the wiring or connectors leading to the fuel level sensor, not the sensor itself. Here's how to repair common wiring issues:
Inspect for Damage: Look for frayed, cut, or burned wires leading to the sensor. Check the connectors for corrosion, dirt, or loose connections.
Fixing Frayed or Broken Wires: If you find damaged wires, use electrical tape to insulate them or, in some cases, solder them for a more secure connection.
Replace Corroded Connectors: Clean the connectors with electrical contact cleaner. If corrosion is severe, replace the connector or its pins entirely.
Secure Loose Connections: Tighten any loose wiring or connections to ensure stable electrical flow.
FAQ
1.How can I tell if my fuel level sensor is failing?
Signs include fluctuating fuel readings, a stuck fuel gauge, or the low fuel warning light staying on.
2.Can I test the fuel level sensor without removing it?
Yes, you can use a multimeter and OBD-II scanner to test the sensor without removing it.
3.What does an OBD-II scanner tell me about the fuel level sensor?
It provides diagnostic trouble codes (DTCs) like P0460, which indicate sensor malfunctions or wiring issues.
4.Can a faulty fuel level sensor affect engine performance?
Yes, inaccurate fuel readings can affect fuel delivery, leading to poor engine performance or stalling.
Conclusion
Testing your fuel level sensor is an important step in diagnosing issues related to inaccurate fuel readings or erratic gauge behavior. By using tools like a multimeter and an OBD-II scanner, you can effectively check the sensor’s resistance, inspect wiring for damage, and interpret error codes to identify faults. If the sensor is malfunctioning, you may need to replace it or repair any damaged wiring. Regularly testing the sensor and addressing issues early can help avoid unexpected breakdowns and ensure your fuel readings are accurate. By staying proactive with maintenance and testing, you’ll help prolong the life of your fuel level sensor and maintain reliable performance in your vehicle.


