For anyone operating equipment that relies on fuel, oil, or water stored in tanks—such as generators, wood chippers, diesel-powered machinery, or recreational vehicles—knowing how much liquid is available at any given time is crucial. One of the most reliable ways to keep track of liquid levels is by installing a mechanical level gauge.
Unlike electronic systems, mechanical level gauges do not require batteries or power sources. They are based on simple physical principles and are favored for their durability, ease of use, and minimal maintenance requirements. Whether you’re managing a genset in an off-grid setup or maintaining a diesel tank in your workshop, learning how to install a mechanical level gauge is a useful skill that can help you avoid running dry unexpectedly and improve operational efficiency.
This article will guide beginners through everything they need to know to correctly and safely install a mechanical level gauge—from understanding how the device works to step-by-step installation instructions and practical tips for ensuring accuracy and long-term reliability.
What Is a Mechanical Level Gauge?
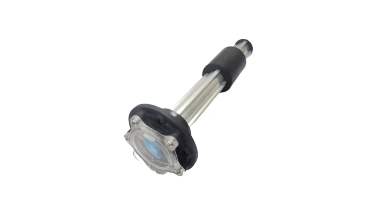
A mechanical level gauge is a device designed to measure and display the level of liquid inside a tank. It typically uses a float connected to a rod or an arm, which moves in response to changes in liquid height. This movement is transferred to a dial or pointer, usually mounted on the outside of the tank, allowing the user to see a reading like “Full,” “Half,” or “Empty.”
Because they work purely on mechanical principles, these gauges are immune to power failures, require no wiring, and can function reliably in harsh environments with dust, moisture, and temperature fluctuations. They are commonly found on fuel tanks, mobile storage units, agricultural machinery, and RV water systems.
Why Choose a Mechanical Level Gauge?
Mechanical level gauges are valued for their simplicity and resilience. Here’s why many operators prefer them:
No electricity needed – They continue to work during power outages.
Durable design – Built to withstand tough conditions.
Cost-effective – Lower upfront and maintenance costs compared to electronic options.
Quick installation – Most models are easy to mount and use without professional tools.
Reliable in the field – Perfect for remote locations or mobile applications.
If you want a solution that “just works” with minimal upkeep, a mechanical level gauge is often the smartest choice.
Tools and Materials You’ll Need
Before beginning the installation, gather the following materials:
A compatible mechanical level gauge (make sure it's suitable for the type of tank and fluid).
A measuring tape to determine tank dimensions.
A marker or pencil to mark the installation point.
A drill and hole saw (or a tank punch, depending on the tank material).
Wrench or pliers to tighten components.
Thread sealant or gasket (if required).
Protective gloves and safety eyewear for your safety.
Always read the manufacturer’s instructions included with your specific gauge model, as designs may vary slightly between brands.
Step-by-Step Installation Process
Step 1: Choose the Right Gauge
Not all mechanical gauges are universal. Some are designed for horizontal tanks, others for vertical ones. Some have a direct-read dial, while others use a cable or arm system. Before installing anything, ensure the gauge is compatible with the tank’s dimensions, orientation, and contents. Most manufacturers list supported tank heights and diameters, as well as compatible fluids.
Step 2: Determine the Mounting Location
The gauge should be installed at the top of the tank, centered if possible, for the most accurate readings. If the tank has a pre-drilled port or threaded cap specifically for a level gauge, that’s the ideal place to install it. If not, you’ll need to create an opening.
Avoid installing the gauge near fill ports, baffles, or any internal structures that might block the float from moving freely. Use your measuring tape to locate the tank’s center point and mark it with a pencil or marker.
Step 3: Measure the Tank Depth
This step is essential for ensuring the float arm reaches the bottom of the tank without hitting it or being too short. Use a measuring tape to determine the full internal height (or depth) of the tank from the top where the gauge will be mounted to the very bottom. Many mechanical gauges come with adjustable rods or arms, so you’ll need this measurement to properly set the float length.
Some manufacturers offer gauges pre-cut for standard tank sizes, while others allow you to trim or adjust the float arm for a custom fit.
Step 4: Drill the Hole (if needed)
If your tank doesn’t already have a mounting point, you’ll need to drill one. Choose a drill bit or hole saw appropriate for the material—metal, plastic, or fiberglass. Make sure to drill slowly and evenly, applying gentle pressure to avoid cracking or damaging the tank wall.
After the hole is made, clean away any burrs or debris. If the gauge includes a gasket or sealing ring, inspect the area for flatness so the seal will be watertight.
Step 5: Install the Gauge Mechanism
Insert the float assembly into the tank through the hole. Carefully lower the arm or rod until it rests near the bottom of the tank without touching. Secure the gauge by tightening it into place, either by threading it into the tank’s opening or by clamping it using the included hardware.
Be cautious not to overtighten, as this could damage plastic components or strip the threads. If the gauge uses a gasket or sealing ring, apply it evenly and ensure a firm seal to prevent leaks.
Step 6: Calibrate and Check Alignment
Once installed, move the float arm manually (if accessible) to ensure it can move freely up and down inside the tank. Watch the dial or pointer as you do this—it should move smoothly in response to changes in float position.
If your gauge is adjustable, calibrate it according to the tank’s height. Some models have set screws or indicator markers you can align with full and empty positions. It’s worth filling the tank partially during this phase to test the reading.
Best Practices for Long-Term Performance
Installing a mechanical gauge is only part of the job—ensuring it remains accurate over time requires regular attention. Here are some tips to keep your gauge in top shape:
Inspect periodically to check for stuck floats or inaccurate readings.
Clean the gauge during regular maintenance, especially if using diesel fuel that may leave residues.
Avoid overfilling the tank, as this can damage the float or cause leaks around the gauge.
Protect the dial from UV exposure or impact. Use a weather shield if the tank is outdoors.
Lubricate moving parts occasionally if the manufacturer recommends it, especially in dusty or cold environments.
Common Problems and Troubleshooting Tips
Even though mechanical gauges are low-maintenance, problems can occasionally occur. The float may become stuck, the dial may stop moving, or the reading may become inaccurate over time. Here are some common issues and their causes:
Stuck float – This could be due to sediment, sludge, or internal obstructions. Try gently flushing or cleaning the tank.
Inconsistent readings – May result from a bent float arm or a loose dial. Remove and inspect the internal parts.
Foggy or unreadable dial – Moisture or UV exposure can cause wear. Replace the dial cover or use a protective shield.
Gauge not responsive to fill level – Double-check that the float arm is correctly sized and not hitting the tank wall.
When to Replace the Gauge
Over time, even the best-built mechanical level gauges may wear out, especially in rugged applications. If you find yourself recalibrating too often, noticing leaks, or getting readings that don’t match the actual liquid level, it may be time to replace the unit. Fortunately, most replacements are straightforward, especially if you’ve already installed the mounting system.
Conclusion
Installing a mechanical level gauge is one of the most practical upgrades you can make to a fuel or water tank system. Whether you’re managing a generator, maintaining heavy equipment, or outfitting a recreational vehicle, the ability to monitor tank levels reliably without electronics provides peace of mind and operational efficiency.
With a bit of preparation and the right tools, even beginners can complete the installation in under an hour. Once in place, a good mechanical gauge can last for years, helping you avoid spills, shortages, and downtime. By following the guidance in this article—choosing the right model, installing it correctly, and maintaining it properly—you’ll gain a dependable tool that keeps your equipment running smoothly and safely.
If you're ready to start your project, make sure to select a quality gauge from a reputable supplier, measure your tank accurately, and follow the steps outlined above. Your fuel or water system—and everyone who depends on it—will benefit from this small but essential investment.


